HEIC Photos Won’t Upload on My Windows – Here Are the Fixes
Are your HEIC photos won’t upload on Windows? If yes, then you are in the right place. Here are some methods you can try to fix this problem with ease.
- Home
- Heic Skills & Problems Fix
- Fixes
- How to Fix HEIC Photos Won’t Upload on My Windows
Recently, many users have reported that when they try to open their iPhone HEIC images on their Windows PC, they fail to do this. Some have reported that uploading HEIC images on web failed from Windows PC. Sadly, HEIC not uploading is a common problem faced by many users. If you are also one of those users who is going through this same issue, then this guide has solutions for you. Here, in this post, we will tell you why you fail to upload HEIC photos on Windows system and what you can do to resolve this problem without much trouble.
You May Like: How to Transfer Photos from iPhone to Computer (Windows 7/8/10) >
Why HEIC Photos Won’t Upload on Windows Computer
After the release of iOS 11 version, iDevices use HEIC photos by default. HEIC (High-Efficiency Image Container) is a container to store High-Efficiency Image Format (HEIF) images. Amazingly, the file size of the new format is roughly half the file size of the JPEG format. While this new file format is remarkably more efficient in terms of storage space, it is not yet widely compatible. This means you may encounter with compatibility issues when you want to use your iPhone HEIC images elsewhere.
That’s why when you try to upload HEIC photos on Windows computer, you fail to do as your Windows system can’t read or recognize this new file format. Furthermore, if you try to share the HEIC image on the web from your Windows system, then you may fail to do this. It is because almost every sharing sites, such as Twitter, Facebook, etc don’t support the new file format. Luckily, if you are using Windows 10 version, then your computer can still read the HEIC image.
So, what if you have installed Windows version below 10? And then, how to deal with HEIC photos on your Windows system? And how you can share HEIC image on the web from your Windows system? How to upload HEIC on Windows system running below 10 versions?
Solutions to HEIC Not Uploading Issue
Fortunately, there are some possible solutions for “upload HEIC problems” and below, we have mentioned them in detail.
Solution 1: Change Image Format on iPhone
You can avoid capturing HEIC photos and go back to the most compatible format i.e. JPG. Although this will take up more memory on your iDevice, it will let you share or upload photos among different operating system environment more seamless.
Here are the steps on how you can do this:
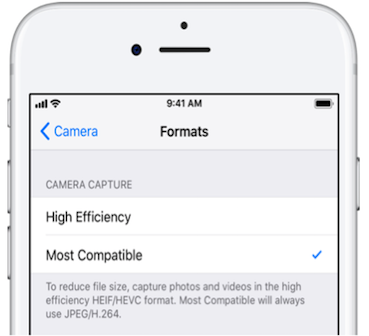
Step 1 On your iPhone, open “Settings” and then, go to “Camera”.
Step 2 Next, click on the “Format” and here, select “Most compatible” format.
HEIC Photos Won’t Upload on My Windows – Fix 1
There is a point to note that this action will be applicable to new photos you will capture with your iPhone, not the already existing photos. For existing photos, you can more to below solutions.
Solution 2: Turn on iPhone Built-in JPG Converter
Another thing you can do is to use built-in JPG converter of iPhone. This will automatically convert HEIC photos to JPG format when you share or upload HEIC photos on your Windows. Luckily, Windows system fully supports JPG format. Below are the steps on how you can do this:
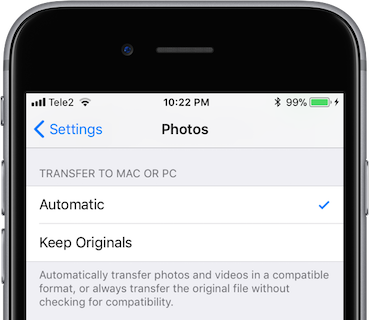
Step 1 Go to your iPhone “Settings” and then, move to the “Photos” section.
Step 2 Next, find “Transfer to Mac or PC” and then, select “Automatic”.
This method is better than above as this way will save your iPhone storage space while the problem you are going through.
HEIC Photos Won’t Upload on My Windows – Fix 2
Solution 3: Email HEIC Photos
The last thing you can do is email HEIC photos you want to upload on your Windows computer. When you email HEIC photos to yourself, this will automatically convert the photos to JPG format that Windows system supports.
The Bottom Line
That’s all on how to deal with upload HEIC problems on Windows system. As Windows system does not provide native support for HEIC file format and that’s why converting this new file format to widely compatible format is better to avoid upload problems related to HEIC.
More Related Articles


iMobie HEIC Converter
FREE & Simple Tool to Convert Any HEIC File to JPG in 3-Step:
- * 100% Free & Safe

