How to Fix Can’t Import HEIC Photos to Mac with the Most Practical Method
Oh, you can’t Import HEIC Photos to Mac? If yes, then you have come to the right page. Here, we have mentioned some solutions you can try to come out of this problem.
Recently, several users have reported that “can’t import HEIC photos to my iMac”. In fact, someone has also reported that “I use El Capitan and iPhone X with iOS 13. Photos I take with my iPhoto will not import into PHOTOS on my iMac. While the thumbnail appears, an alert exclamation is all I get. Only started with iOS 13!!”.
If you are also one of those users who can’t Import HEIC Photos to Mac, then you can refer to this guide. Here are some fixes that you can try so that your Mac can able to recognize HEIC photos.
How to Fix Can’t Import HEIC to Mac
For the first time, Apple is using HEIC (High-Efficiency Image Container) file or container to store HEIF (High-Efficiency Image File) images on iDevice running on iOS 11 or later. It is developed by the MPEG group. It truly takes less storage space to store images and approximately, the file size of this new file format is about half the file size of JPEG format without quality loss.
Sadly, you can’t import new HEIC photos on iMac, MacBook, and iMac Pro running macOS Sierra 10.12.5 or lower. If you try to do this, then you may get an error message saying “these items can’t be added to your Photo library because it may be an unrecognizable format or the files may contain invalid data”. The only way you can use to recognize HEIC photos on your Mac is to update your Mac OS to macOS High Sierra or later that supports HEIC images.
If you still want to import your HEIC photos to your Mac without updating your Mac, then luckily, there are some feasible ways you can try to fix this issue with ease.
Fix 1: Change “High Efficiency” to “Most Compatible” on iPhone
You can change image settings on your iPhone after updating your iPhone device version to iOS 11/12/13. You just have to change HEIF image format to most compatible JPEG format and after that, images you will take with your iPhone will save in JPEG format that your Mac can read.
Here are the steps on how you can do this:
Step 1. To begin the process, go to your iPhone settings and then, open “Camera” settings.
Step 2. Text, go to the “Formats” section and here choose the “Most Compatible” format.
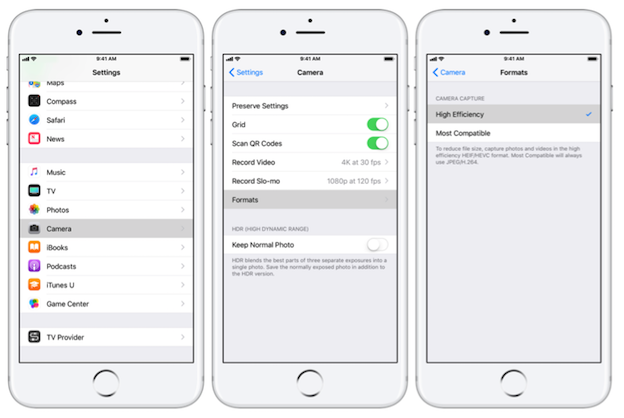
How to Fix Can’t Import HEIC Photos to Mac – Fix 1
This feature will work for photos that are taken later. You have to use other ways of existing photos.
Fix 2: Use iPhone Built-in JPG Converter
Luckily, there is a built-in JPG Converter on iPhone that automatically converts the HEIC images into the JPG format when you import it to your Mac.
Here are the steps on how you can do this:
Step 1. To begin the process, go to your iPhone settings and then, move to “Photos”.
Step 2. After that, choose “Automatic” in the Photo tab under “Transfer to Mac or PC”.
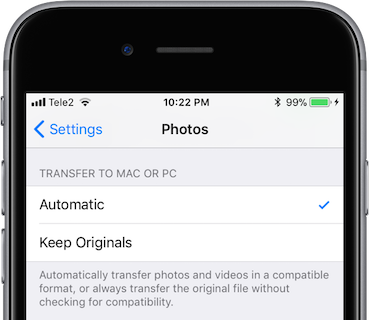
How to Fix Can’t Import HEIC Photos to Mac – Fix 2
Fix 3: Email HEIC Images
Another way you can try to import your iPhone HEIC images to your Mac is to email the HEIC image to yourself from iPhone. This will automatically convert HEIC images to JPEG format. After that, you can download HEIC images on your Mac by accessing your email account.
Fix 4: Try Different Cable or Port
You can try different USB cable or port if you fail to import HEIC images to your Mac even after using the above photos. There can be a possibility that a problem resides within the USB port or cable you are using to connect your iPhone to Mac.
Fix 5: Try AnyTrans to Import HEIC Photos to Mac
AnyTrans, as a professional data management software, which commits developing an easier file management life for iOS users. You can transfer any files you like from iPhone/iPad/iPod to Mac/Windows and mobile devices. Here are the steps to import HEIC photos to Mac:
Step 1. Download AnyTrans and run it on Mac > Connect your iPhone to Mac > Choose the Content to Mac.
Step 2. Click on the Photos Streams > Select the HEIC photos you want to import > Tap on the Mac icon to import.
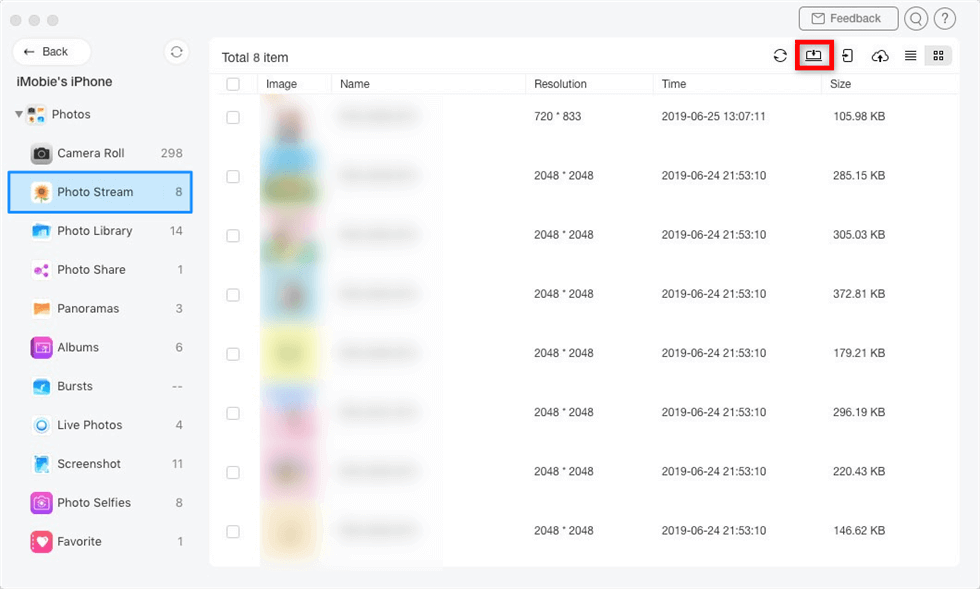
How to Fix Can’t Import HEIC Photos to Mac
The Bottom Line
That’s all on the issue “can’t Import HEIC Photos to My iMac”. As HEIC i.e. new file format poses compatibility issues and that’s why it is better to convert this format into compatible format i.e. JPEG that works on every platform.
More Related Articles

iMobie HEIC Converter
FREE & Simple Tool to Convert Any HEIC File to JPG in 3-Step:
- * 100% Free & Safe
Hot & Trending
 How to Import HEIC into Lightroom on Windows and Mac
 How to Convert HEIC to MOV
 How to Download HEIC Photos as JPG in Google Photos
 How to Open HEIC Files in Photoshop
 How to Open and View HEIC File on Android
 How to Change a HEIC File to JPG on iPhone
 The Best 5 Free HEIC Viewer for Windows and Mac
