How to Convert HEIC to JPG on PC/Mac
If you want to have the JPG versions of your HEIC files, the following guide will teach you how to convert HEIC to JPG so all of your HEIC files are available in the widely supported JPG format. Just read on to learn how.
HEIC is a new file format for image files introduced by Apple in 2017. Since the release of iOS 11, all the photos you capture on your iPhone or iPad use this new format for your images. While the format can be viewed on the iOS devices by default, you cannot view HEIC files on your Windows PCs and Macs since these do not have native support for it.
However, that does not mean there are no ways for you to access this format on your computer. One of the best ways to access HEIC on your computers is to convert your HEIC files to the popular JPG format. It should make your images viewable on almost all the devices out there. And the following is how you perform the conversion process.
How to Convert HEIC to JPG on PC
If you are a Windows user, this section will teach you how to convert HEIC to JPG on a PC. Since Windows is developed by Microsoft and not Apple, your PC does not come with native support for the HEIC file format. Therefore, you need to first convert your HEIC images to a compatible format before you can access them on your machine.
However, there is a service by Apple that works equally well on Window PCs. It is called iCloud and it allows you to upload, keep, and download your files from the cloud. If you use the service for your HEIC files, the following is what you need to do to convert your HEIC to JPG on a PC.
Step 1. Log-in iCloud account and select photos to convert.
Open a browser on your PC and head over to the iCloud website. Log-in to your account and select the Photos option on the following screen.

Access Photos option on the iCloud website
Step 2. Convert the selected photos to JPG.
When your photos are loaded, select the files you want to download and click on the download icon at the top. Your files will be converted to JPG and then downloaded to your PC computer.
While the above procedure should work for everyone using iCloud, it will not work if your HEIC files are located outside iCloud. In that case, your best option is to use the HEIF Image Extensions app which will let you convert and access your HEIC files in the Photos app on your PC.
How to Convert HEIC to JPG on Mac
If you are a Mac user, this section will teach you how to convert HEIC to JPG on your Mac. Unfortunately, the extension that lets you convert and access HEIC files on Windows is not available for Mac. However, there are some other ways to convert HEIC to JPG on a Mac and the following is how you do it.
Step 1. Update to the latest MacOS version.
Click on the Apple logo at the top left corner of your screen and select About This Mac. On the screen that follows, click on the Software Update button to update the version of macOS to macOS High Sierra or later on your machine.
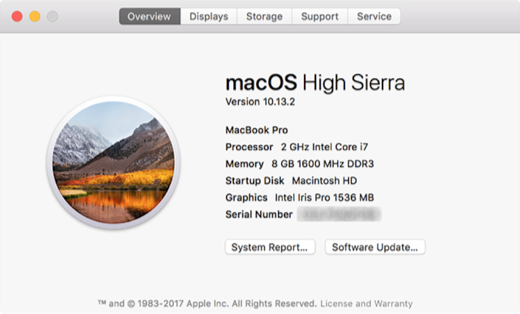
Update your Mac to the latest operating system version available
Step 2. Select the HEIC files and preview.
When the OS is updated, right-click on your HEIC file and select Open With followed by Preview. It will launch the file in the Preview app on your Mac.
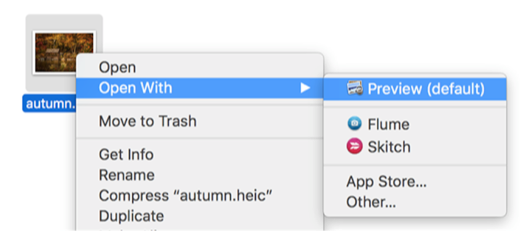
Open the HEIC file with Preview on Mac
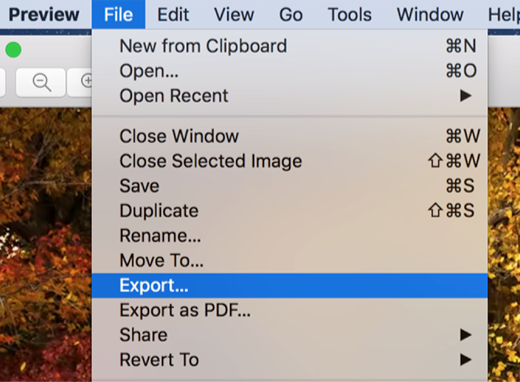
Step 3. Export the selected HEIC files.
When the file opens in Preview, click on the File menu at the top and select Export. It will let you convert your HEIC to JPG.
Export HEIC file from the Preview app on Mac
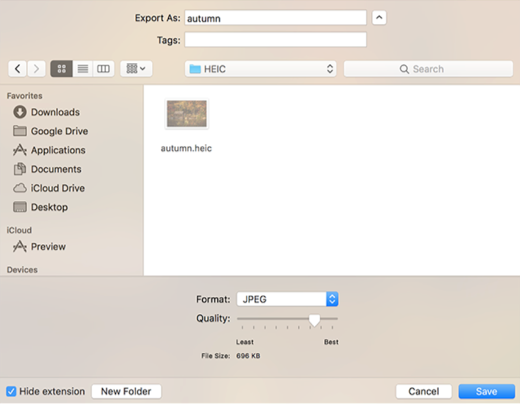
Step 4. Convert the HEIC files to JPG.
On the following screen, select JPEG from the Format dropdown menu. Then, click on the Save button to save the JPG version of your HEIC file.
Convert HEIC to JPG on Mac using the Preview app
You should find the converted JPG file in your selected folder on your Mac. That is how you use Preview to convert HEIC to JPG on Mac machines.
Convert HEIC to JPG on PC/Mac with iMobie HEIC Converter
If you are looking for a universal solution that works on both Windows and Mac computers, Free Online HEIC Converter – iMobie HEIC Converter, is an ideal app for you.
iMobie HEIC Converter is an app based on the web that allows you to batch convert your HEIC files to the JPG format online, without downloading and installing at all. More than anything, it is totally free for you. It has some configuration options as well to ensure your files are converted the way you want. The following is how you perform the conversion process with this app.
Step 1. Run iMobie HEIC Converter.
Head over to the online HEIC-to-JPG Converter website using any of the browsers on your Mac or PC computer.
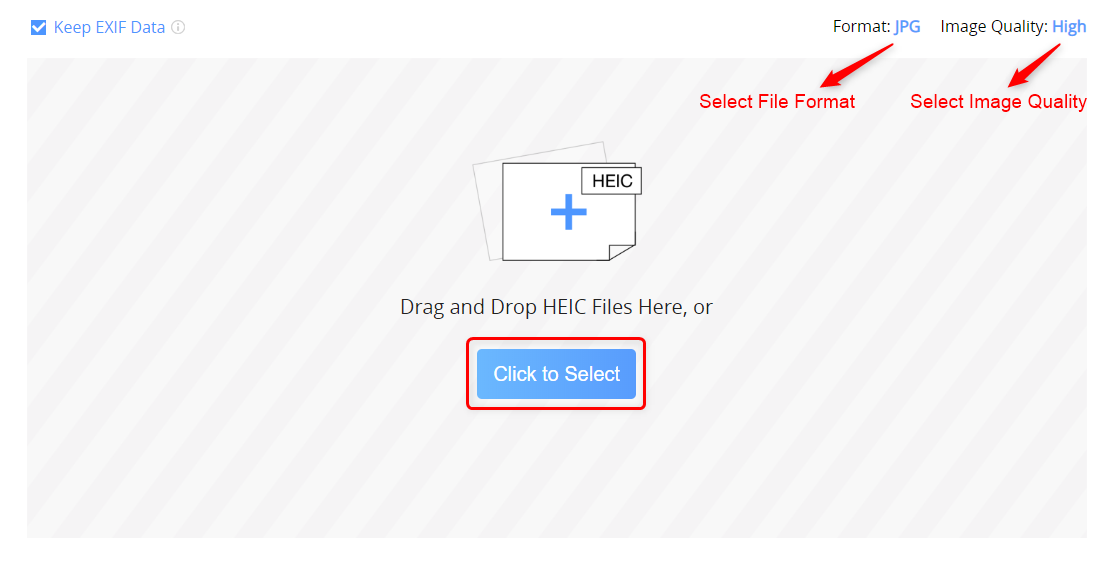
Step 2. Select the HEIC files you want to convert.
Click on Click to Select or drag and drop your HEIC files onto the app panel. Checkmark the Keep EXIF Data option if you wish to preserve the data. Choose an image quality level from the Image Quality menu.
Convert HEIC Photos to JPG Using iMobie HEIC Converter
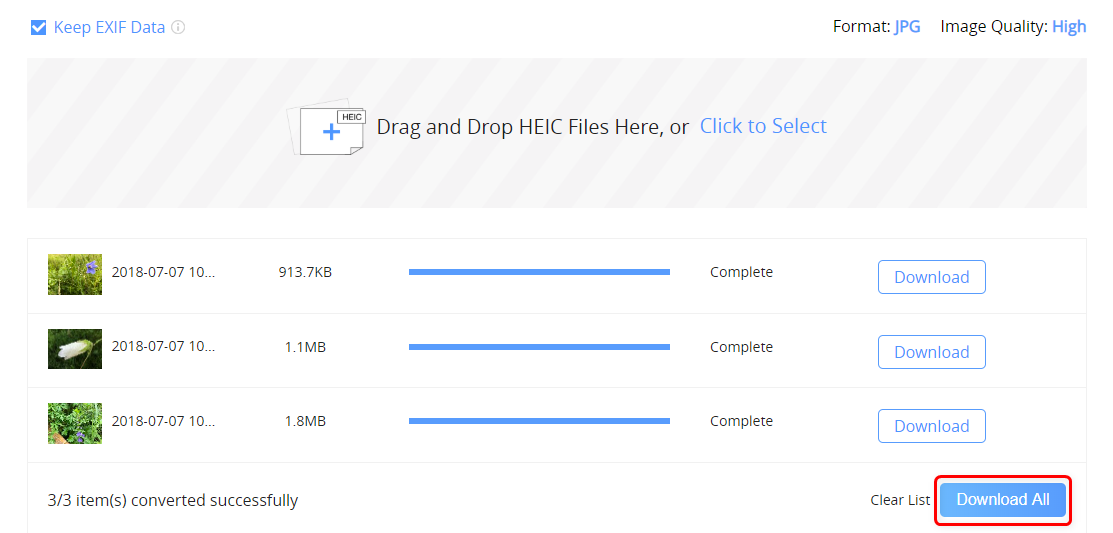
Step 3. Convert HEIC files to JPG.
Soon as the app has converted your files, download and save the files to your computer.
Download Converted Photos to Your Computer
There you go. The converted files should now be available for you to view on your Windows PC or Mac. The solution works across platforms and all it requires is a web browser for you to access it.
The Bottom Line
If you have not found a solution on how to convert HEIC to JPG yet, our guide above should provide you with multiple methods to convert HEIC files to JPG on both Windows and Mac computers. We hope it helps you out.
More Related Articles

Popular Articles & Tips You May Like


A writer for iMobie, has been covering iOS, Mac, and Android related How-to Articles / Apps Reviews for 5+ years. Like sharing something about data transferring & recovering knowledge.

iMobie HEIC Converter
FREE & Simple Tool to Convert Any HEIC File to JPG in 3-Step:
- * 100% Free & Safe